Thursday, November 4, 2010
ZTE MF 628 Unlock කර ගන්නෙ මෙහෙමයි
මේක මම මුලින්ම දැක්කෙ ලහිරු මල්ලිගෙ බ්ලොග් එකෙන්.
කොතනින්ද හොරකම් කලේ කියල මුලින්ම කියන්න එපැයි :)
* මුලින්ම කරන්න තියෙන්නෙ මෙතන ඔබලා මේ software එක බාගන්න.
* දැන් බාගත්තු rar file එක unzip කරගන්න. (winrar පාවිච්ච් කරල මෙක කරගන්න පුලුවන්)
* දැන් dccrap.exe file එක double click කරල open කර ගන්න.
* ඊට පස්සේ පහල රූපයේ විදියට open උනාට පස්සේ මොඩෙම් එකට වෙනත් ජාලයක සිම් පතක් දමා (උදා-Dialog එකෙන් දුන්න එකකට Mobitel එකක් දමා) USB port එකකට පල්ග් කරන්න.
ඊට පස්සේ මොඩම් එකට අදාල connection manager software එක (උදා-Dialog Manager) ධාවනය වුනොත් විතරක් ඒක close කරලා දාන්න.මොඩම් එකට memory card එකක් ගහගෙන ඉන්නවනම් card එක මුලින්ම ඉවත් කරලා ඉන්නවානම් හොදයි.මොකද unlock කරන අවස්ථාවේ වෙනත් මෘදුකාංග මොඩමයට සම්බන්ධ වීම බාධාවක් නිසා.
ඊට පස්සේ රූපයේ
01 ලෙස දක්වා ඇති drop down menu එකෙන් ZTE data cards කියන ඒක select කර ගන්න.
02 ලෙස දක්වා ඇති drop down menu එකෙන් Auto Detect කියන විකල්පය select කරගන්න.
03 ලෙස දක්වා ඇති Find button එක ඔබන්න. ඉන්පසු ටික වේලාවකින් සම්බන්ධ කොට ඇති මොඩමයේ වර්ගය පහල text box එකේ සටහන් වේවි.
04 ලෙස දක්වා ඇති Unlock button එක ඔබන්න.තප්පර කිහිපයකට පසු මොඩමය සාර්ථකව unlock වූ බව පහල text box එකේ සදහන් වේවි.
පහත රුපය බලන්න
ඊට පස්සේ ඉතින් මැසිම restart කරන්න.
Wednesday, October 13, 2010
‘බොක්සිං මංජු’ ලක්දිවට රන් ගෙනේ
Tuesday, September 14, 2010
Clean Your DNS Cache to Fix Browsing Problems
ipconfig /flushdns

net stop dnscache

net start dnscacheFriday, May 7, 2010
Unit testing with PHPUnit
PHPUnit
In the last decade, PHP has developed from a niche language for adding dynamic functionality to small websites to a powerful tool making strong inroads into large-scale Web systems. Critical business logic like this needs to work correctly. But how do you ensure that it does? You test it, of course.
To make code testing viable, good tool support is needed. This is where PHPUnit comes into play. It is a member of the xUnit family of testing frameworks and provides both aframework that makes the writing of tests easy as well as the functionality to easily run the tests and analyse their results.
Features
- Complete port of JUnit 3.8.1 to PHP 5.
- Integrates ideas from TestNG, such as
- Annotation-based @grouping of test cases.
- Suite-Level setUp() and tearDown().
- Testing for failures.
- Supports Mock Objects (port of jMock).
- Supports database testing (port of DbUnit).
- Supports Code Coverage Analysis (utilizing the Xdebug extension for PHP) and can generate reports based on this information.
- Supports the calculation of software metrics.
- Can be used as a Project Mess Detector (PMD).
- Supports storing test result and code coverage data in a Test Database.
- Supports Incomplete Tests (port of junitour) and the skipping of tests.
- Supports Agile Documentation (port of TestDox).
- Supports generation of test code skeletons for existing code.
- Supports logging of test execution in an XML Format, as JavaScript Object Notation (JSON) messages, using the Test Anything Protocol (TAP), in GraphViz Markup, and to PEAR::Log sinks.
- Integrates with Selenium RC for web application user interface testing.
- Integrates with Apache Maven, Bamboo, Bitten, CruiseControl, and Parabuild for Continuous Integration.
- Integrates with Phing.
- "Self-Hosted" and Robust: PHPUnit is covered by a Test Suite that ensures it works correctly.
Fiddler
What is Fiddler?
Fiddler is a Web Debugging Proxy which logs all
Fiddler is freeware and can debug traffic from virtually any application, including Internet Explorer, Mozilla Firefox, Opera, and thousands more.
Friday, April 16, 2010
PHP, PHPUnit, Selenium and NetBeans IDE
1. Go to the \bin\php\phpX.X.X directory
2. Run the following command
php.exe -d phar.require_hash=0 PEAR/go-pear.phar
3. And then open php.ini, find the key "error_reporting". Set it as below
error_reporting = E_ALL & ~E_DEPRECATED
4. Restart all servers in wamp
Installing PHPUnit
1. Go to the \bin\php\phpX.X.X directory
2. Run the following command
aptitude install phpunit
3. Then the following
aptitude install php-pear
4. Then the following...
pear install phpunit/PHPUnit
5. If you are getting an error as “No valid packages found Install failed” then run the following command
pear upgrade-all
6. Upon successful completion of Step 5, re-run the command in Step 5
If you are not able to create PHPUnit tests via “Create PHPUnit tests” please follow the below steps.
1. Go to the \bin\php\phpX.X.X directory
2. Edit phpunit.bat
3. Verify “set PHPBIN” value. Provide the exact location of php.exe file.
Example: If php.exe and phpunit.bat are in the same directory and if the phpunit.bat shows as set PHPBIN=".\php.exe", it should be corrected as set PHPBIN="php.exe"
4. Verify the value of %PHPBIN% and correct it as required
Installing Selenium in NetBeans IDE
1. Go to the \bin\php\phpX.X.X directory
2. Run the following command
pear install Testing_Selenium-beta
3. Open IDE and go to Tools -> Plugins
4. Install Selenium Module for PHP
Ref by Bhagya's blog
Wednesday, March 24, 2010
How to Unlock the Huawei E220 HSDPA modem
Disclaimer: I’m not responsible, nor will be held liable, for anything you do with the information I provide in this tutorial. Use it at your own risk.
Ok, since we are done with the traditional "Disclaimer" Lets see what you have to do.
First you'll have to download the following tools.
e220 CardLock UnLocker
e220 Updater version 11.117.09.04.00
QC Mobile Analysis Tool
And a Hex editor. But if you do it correctly you can do it with an ordinary text editor too ;)
Or you can download and extract this file. It contains all the tools we need for the job, including a lightweight portable hex editor :)
Basically, Unlocking the e220 is simple as running the E220 CardLock Unlock tool and entering the unlock code and pressing the "Ok" button. But that's when you "know" the unlock code.
So how do we find the unlock code for our modem? that's where the other tools come in handy.
Plug your modem to the computer and run the E220 Updater. Wait till it detects your modem and then press the "Cancel" button. yes! Cancel it! This is just to make it easier for the "real tool" to identify the modem.
Now open the QC BQS Analyzer and click on Hardware forensics menu, select Use Com/USB Port
Now the "QC Com Diag" window should be open. Most of the time your modem and com port is automatically selected on the Serial Com port drop down list. If not you'll have to select it manually. And then click on the "Send Cmd" button and wait till the message "Successfully sent command" appears on the bottom right.Now Select " Read EFS" from the Diag Functions drop down menu and Click the "Lets go"button. When it asks, enter the file name e220.bin and save it. A message saying "Successfully read EFS" should appear.
Now its time to do some hex reading :) Open the e220.bin file from your Hex Editor. And search for the ASCII string Sd, (including the comma) or Search for the for the Hex string 53 64 2c
After few random characters you'll see a clean 8 digit code. Believe me, it's easily recognizable and guess what! thats our Unlock code :DOnce you've found the unlock key all you have to do is enter it on the CardLock Unlock utility and click "OK" And your modem is... Unlocked!!! :D
Hope this will be helpful. I'd absolutely love to know your views on this. Good luck with unlocking your modems :)
thanx for
Thursday, March 18, 2010
Adding Zend PHTML extension in Dreamweaver

If you’re using the Zend Framework and Dreamweaver, you’ve probably noticed you can’t open PHTML files in Dreamweaver. Here’s how to add it. You’ll need to modify three separate files:
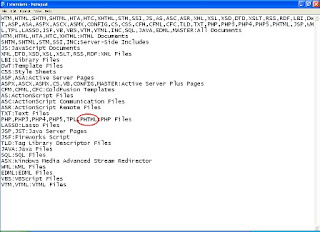
- Open Documents and Settings > [user] > Application Data > Adobe Dreamweaver > en_US>Configuration > extensions.txt. Keep in mind this is for Windows XP and the file may be located elsewhere for other OS’s.Add PHTML to the first line of this file as shown circled below:
 and add it again to the PHP line as shown circled below:
- We’re going to do this again but in another location. Open Program Files > Adobe > Dreamweaver [Your Version] > configuration > Extensions.txt and repeat step 1 above.
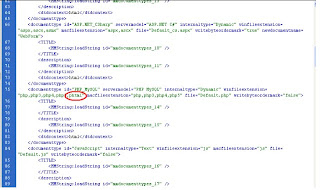
- Open Program Files > Adobe > Dreamweaver [Your Version] > configuration > DocumentTypes > MMDocumentTypes.xml. In the middle of the file there will be a section for PHP_MySQL. You will add PHTMLto it twice as shown circled below:
 Restart Dreamweaver and you should now be able to open PHTML files with normal PHP syntax highlighting.
Wednesday, March 17, 2010
Tomcat server logging
Product Overview
A free real-time log file monitoring tool
Real-time file viewing
Optimised real-time viewing engine
View files of any size (> 2GB)
Scroll to any point in the whole file instantly
View files over a network
Configurable line wrapping
Configurable TAB expansion
Configurable font, including spacing and offset to maximise use of screen space
Follow tail mode
View the end of a growing file in real time, no matter how fast the file grows
Like "tail -f" on Unix systems, but with many more features
Tail multiple files
Simultaneously monitor multiple files for changes using tabs
Visual indication on each tab of file status and changes
Tabs may be positioned on any side of the window and oriented horizontally or vertically
Configurable highlighting
Lines containing particular strings can be highlighted to help you notice important text
Highlight colours are fully customisable
International character sets
Unicode
UTF-8
ANSI
ASCII
Many file formats
Windows / DOS text files (lines end in CR/LF pairs)
Unix text files (lines end in LF)
Microsoft IIS logfiles (and other files terminated with a string of nulls)
Flexible configuration options and storage
Many configurable user preferences
Preferences can be saved to a file, the registry or not at all on exit
Preferences are loaded from a file in the local directory, a file in the application directory or the registry (in that order)
Preferences can be loaded and saved at any time by the user, and shared with other users
Single small executable, no installer
No installation needed, start using the tool immediately
Small executable can be run from the network
Easy to temporarily install and then completely remove


